
In my last
As you start on your journey to using a planner every day, you may start to become overwhelmed.
“Should I get a store-bought planner and just plan with that? Or should I make something unique for my life? Do I go with a ring planner or a traveler’s notebook? Maybe I should bullet journal.
Hmm.. A5, A6, Personal or Pocket? Why are there so many sizes? How do I print and cut these inserts? Do I need stickers and washi tapes?”All the thoughts of a new planner girl
This is because there are so many different types of planners and methods people use. But planning definitely shouldn’t make you feel overwhelmed. It shouldn’t be
In all my years of planning, I have tried out all the planners, all the sizes, and all the layouts. But the one thing that helped me was just by keeping it simple. It has been the greatest thing to happen to my productivity levels. In today’s post, we are going to talk about keeping it simple. Keeping your planning simple, and keeping your planner simple. Here are some ways to simplify the entire process so you don’t get overwhelmed with your planner.
Avoiding Overwhelm with your Planning
Start With a Flexible Brain Dump
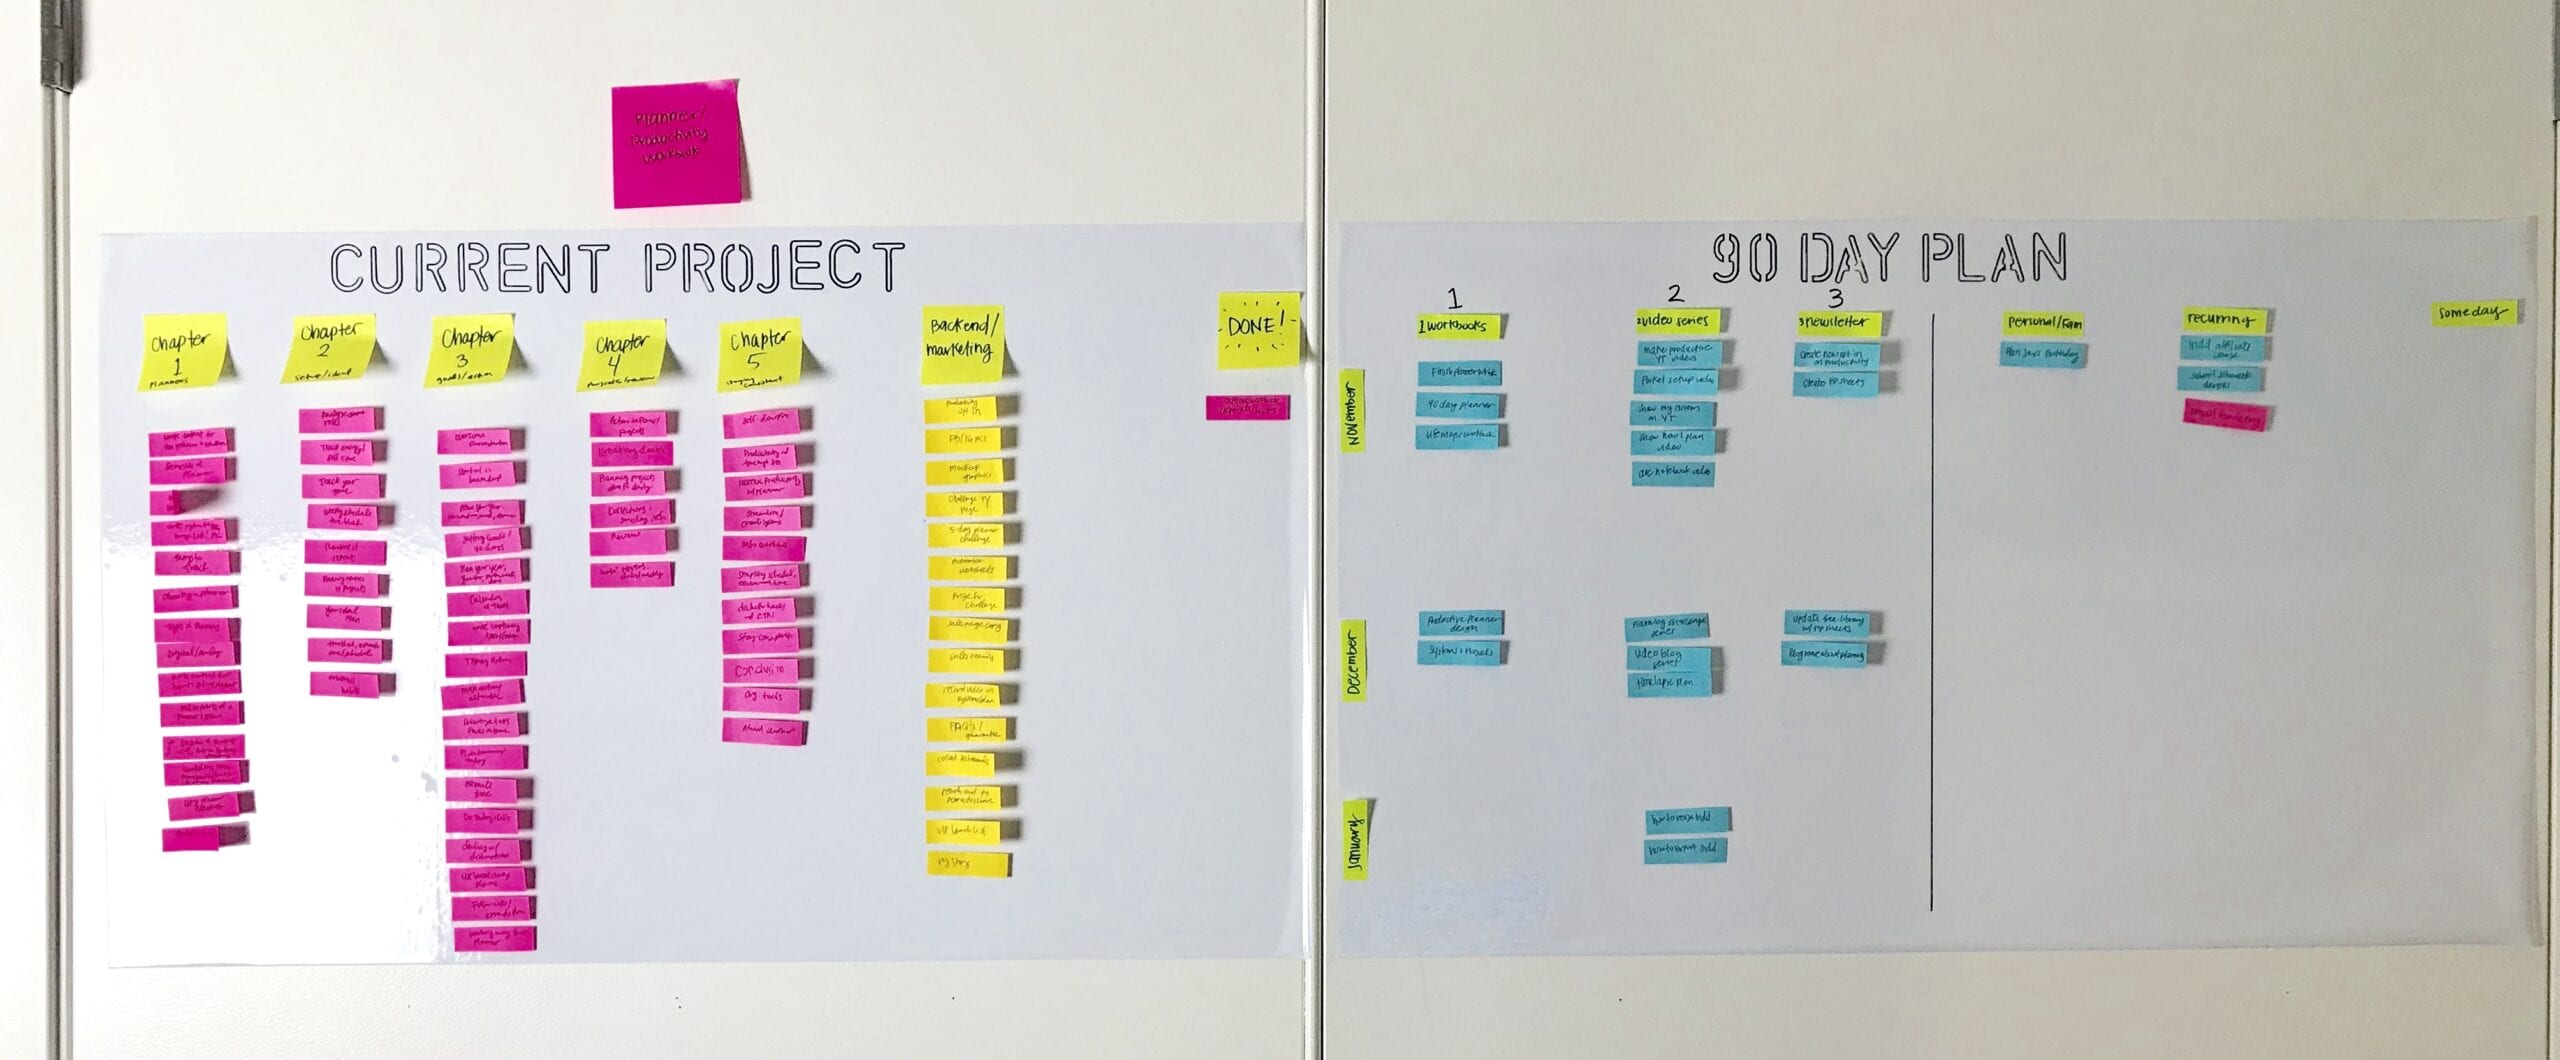
Whenever I get into a planning slump, which is more often than I’d like to admit, I always go back to the whiteboard (literally). This exercise always brings me back to center and I hope it will help you too.
I have a stick-on dry erase board in my office filled with post-it notes. Whenever I feel like my planning isn’t working for me, the first thing I do is write down everything that’s on my mind on little post-it flags. This great brain dump is perfect for anyone who is feeling overwhelmed by all the things. Just writing things down, getting it out of your head and onto paper makes it feel a bit more organized. You may feel

Now that you have ALL the things out of your head and onto post its, it’s time to organize it all. First start by categorizing it all. Then put it all in order by time, what needs to be done first or what needs to be done now?
After doing that, your list may still look and feel overwhelming, but just remember that you don’t have to do ALL the things. Start culling the list. What can be eliminated from your list, what can be delegated to someone else, what can wait until you have more time (next month, next quarter)?
Focus on Results
Now focus on only the things that will bring you the results you want. What was your goal, will doing these tasks relate to your goal? At the end of this year or this quarter or this month, will you feel accomplished and closer to your goal by doing these certain tasks? Choose the tasks that will.
Still have a lot on your list and don’t know which to start with first? Then choose the one that excites you. The one that is fun, the one that brings you joy.

Now that you have a smaller list it’s time to finally plan! Don’t you already feel less overwhelmed? Now here are some of those tips I promised you…
Turn it Into a Daily Routine
Using your planner should become a part of your daily routine. I always spend 5-10 minutes at the end of my day to plan for tomorrow, today. Pick a time of day when you have a few extra minutes to write down your notes and plans for the upcoming day or week. In the afternoon I always check my planner to see what I have accomplished and what still needs attention.
Write only 3-5 Tasks on your Daily To Do List
The best way to get overwhelmed with planning is by trying to do EVERYTHING. You don’t need to do it all. You just need to focus and finish on one thing at a time. When making your to do list every night think of the 3 biggest things that absolutely needs to be done and which will help you move you closer to the results you want.
Set Just a Few Goals
Be easy and simple with your goal setting. You don’t need a bucket list of goals, but just some realistic and achievable goals to get started. Choose only 1-2 to focus on for now. I would start with planning for the next 90 days, what would you like to have accomplished at the end of those 90 days? Ask yourself that question and focus on that result. Doing too much will only overwhelm you. And do not write your goals and projects on your to-do lists. Break it down from there into projects and then break those down into tasks. Every day when you’re making your plan include some of those tasks into your daily to-do’s. Soon you’ll be finished with that project and one step closer to your goal!
Avoiding Overwhelm with Your Planner
Now we’re going to talk about keeping the planner itself simple. Here are some tips for keeping your planner simple.
Use a Simple Planner
There are a lot of amazing planners out there, but if you want to keep it simple, use a simple planner
Declutter Your Planner
This is for those who already have a planner. If you’re in a ring-bound or TN, take out everything. Now put back only the things that
Keep the Setup Process Simple
When you are setting up a new planner, you don’t need to start with a planner that requires a lot of set up. Buy a happy planner from Michael’s. Or if you want a ring binder then buy the Filofax inserts for your planner size. It’s dated, it has a yearly, monthly and weekly plan and that’s all you’ll really need to plan and schedule your days. Especially if this is your first ever planner, you don’t want it to be a complicated process. If you expect too much from your planner on the very first day, you might become stressed or overwhelmed, and not be encouraged to use it effectively. This will completely defeat the purpose of the planner. Remember, simple is best!
Start Small with Important Dates
Set up your planner with just the most important dates, your big rocks. What things are set in stone. What events already have a date and time specified in your schedule? Whether that means birthdays and anniversaries, or just some appointments you don’t want to forget about. Write those down in your planner.
Don’t Fill Out Every Page Right Away
You may have a lot of amazing pages available in your planner, but that doesn’t mean you have to use them all right now. Just fill out the calendar and task list pages, and leave the rest for later.
Avoid the Need to Use Stickers or Washi Tape
You definitely do not need to use stickers or washi tape. If it interferes with your planning and doesn’t help you feel more accomplished then avoid it. Stickers can be used for making things stand out but if you don’t have that specific sticker don’t stress about having to go buy one or waste precious time finding it, just write it down! Stickers and washi tapes are for decoration purposes to make it fun, if it’s not fun for you, if it stresses you out then why use them?
Don’t Look at Other People’s Planners
Looking at other people’s planner should be for inspiration for your own planner. No one’s system will fit for your exactly. If looking at their planner makes you want to add more and more to your planner even when you don’t need it then you need to stop looking and consuming until you can really implement those plans. Don’t let it be a distraction for you to keep planning instead of getting things done.
Expand Only When You’re Ready
Expanding your planner is great, but again, it should only happen when you’re ready. Take it slow and let it get more complex
Don’t Stress About Making it Perfect
Remember that the planner is a reflection of your life, not something meant to be absolutely perfect. It should be convenient for you, well organized, and functional. It doesn’t have to be pretty, overly complicated, or flawless. There will be mistakes, there will be days where you didn’t get to cross off anything, but don’t scrap the
It can be fun to share on social media, maybe even motivating to help you get things done, but if this causes you more stress, then just keep it private!
If you want to learn more about how to create a plan for your goals head over to the Slay Your Goals Guide.
Thanks for reading!

Any questions? Ideas? Let me know below