As the new year started I was feeling so overwhelmed and stuck. Whenever I feel that way I take a look at my environment and if it’s the cause of my overwhelm. I felt like my life was out of control and I needed a way to take back control. One thing I know I can quickly take control of is my space. So I set out on a journey to declutter and organize my stuff!
Table of Contents
Simplify & Declutter
When you have too much stuff it can start to feel out of control. I’m guessing the majority of the stuff in your house isn’t even used. In this post, I want to share with you how I simplified and organized my stuff so I can focus more on the important things in life.
I follow the KonMari method of decluttering. Marie Kondo is the author of The Life-Changing Magic of Tidying Up. Her method involves focusing on what to keep, rather than what to toss. I especially love how she tells you to “thank” your item if you are getting rid of it. Showing it gratitude will help you to feel less guilty about letting it go. The main principles of her method
Rules to Remember:
Don’t overdo it. Don’t try to do your house in one day. You will end up getting frustrated and give up. You need to avoid burnout by setting aside time frames for each room or area.
Don’t organize before decluttering. Before organizing everything you need to purge your home of all the stuff that are taking up space. The organizing part is fun, I know, but you’ll just waste your money if you go and buy all the cute organizers before purging.
Don’t keep that stuff in your house! If you are donating or giving away items, get it out of the house immediately! You will still feel cluttered if it’s sitting by the front door or in a closet. I always like to move it to the trunk of my car so I can take it to the donation center right away.
Don’t buy more stuff. After decluttering you might want to treat yourself by buying something fun. Don’t yet! Take a few days before buying it to see if you still really need or want it. Don’t continue the bad habit of gathering clutter into your home.
Step 1: Know Your Why
When decluttering gets difficult, you need to remember why you are doing it in the first place. Your why will keep you on task. You won’t be successful if you don’t have a reason why. Imagine and visualize what your home will look like once you own only the things that bring you joy. Will you feel
Step 2: Set Aside Time
Decluttering your life won’t happen overnight. Set aside lots of time for the project. Check your schedule and see when you would be able to work on decluttering whether it’s 10 minutes a day or 10 minutes a week. Having a time frame provides structure for you, so set aside and schedule that time.
Step 3: Gather Your Tools
To make decluttering easier, you will need some tools to get you started.
- Garbage bags for trash and recycle
- Boxes/Baskets for sorting (Keep, Donate, Sell, Move to another room, etc)
- Marker for labeling
- Large empty floor space or bed to lay everything out
- Organizers/Storage containers
- Label maker
Step 4: Start Small
Clear just one surface. The best way to get instant results from decluttering is by clearing countertops! I love doing this for a quick win. So find a surface in your home and clear it. Make sure it is a surface you see daily and try to keep it clean and clear!
Empty a shelf. Find a shelf in your home and try to clear it out. Find homes for all those things and try to keep it neat.
Dump out one drawer. Pick one drawer in your home and dump it out. Put back only the things that you need.
Find homes for your things. Choose items that always seems to get left out regularly and find a special home to store them.
Step 5: Sort and Classify
Find all the things of a specific category. If you have duplicates get rid of one. If you have them in multiple places gather them and put them together. Things that are used together belong together. Store them all in one place. I love using this KonMari Checklist. It’s color-coded and includes all the broken down categories! Breaking down the categories makes it super easy to get started as well! When you gather all the items in a specific category you can really see how much you have and putting back the things you love only makes it easy to get rid of the rest.
Some things I don’t keep together sometimes though are cleaning supplies. Things I use to clean the kitchen goes under the kitchen sink and I like to keep cleaning supplies in each bathroom as well.
Step 6: Start Organizing
Now comes the fun part!
Find a home for all the things you are keeping. Create a home that will help you feel more organized. My favorite is our basket for keys by the front door. We never lose our keys now! I also bought a mail organizer and labeled the sections “To File”, “To Shred”, and “To Transfer”. Knowing where stuff belongs makes it easier to keep everything tidy and lowers the chance of clutter becoming a recurring problem.
Organize your clothes by type or color. This will save you time when looking for what to wear. Don’t forget to label everything! This will help you to remember where things go.
Label EVERYTHING you can! I love my label maker, not just for myself but for the fmaily as well. Now that everything is labeled they know exactly where to put things back.
Store things vertically. Storing things vertically will help you to see everything you have and keep you from buying duplicates of stuff. Fold your clothes vertically, stack Tupperware and ziplock bags vertically. Find storage containers and organizers that will help you do this.
Organize little items using sectioned organizers or jars. This is great for office supplies.
Get a cleaning caddy to keep all your cleaning supplies together and in one place.
Step 7: Set Limits & Rules
To control the clutter you need to set limits on things that come into your home. For example, I have a drawer for bags. If that drawer is full already I won’t keep the extra bags. If my T
Everytime you buy clothes, get rid of two or more clothing items. This rule will also work for kitchen gadgets, shoes, books, toys etc.
Step 8: What To Do With The Stuff You Are Getting Rid Of
Sometimes it can be hard to just toss your things, so instead you keep it. But there are many solutions to feel less guilty. Some ways you can let go of things are:
- Donating it to a local charitable organization or local non-profit thrift shop.
- Sell larger or more valuable items on the internet or locally through facebook marketplace or craigslist
- Try to sell items to a local vintage resale or consignment hsop
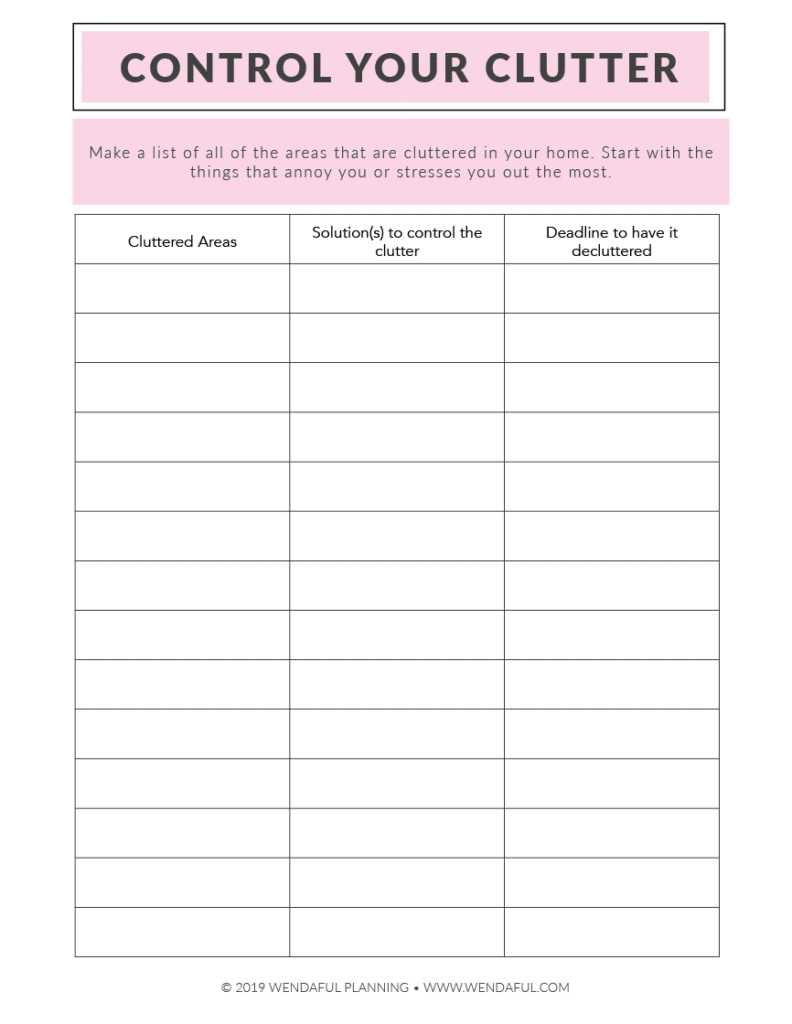
After just two weeks of decluttering my problem areas, I already feel clearer. I feel like now I can get to work because my space feels cleaner. I am nowhere close to finishing all the categories but I did work on all the problem areas in my home. To help you focus and conquer your clutter I made this worksheet which you can download here.